Cauli-Rice Onigiri

Thursday, June 17, 2010

First, I will freely admit a good deal of my technique is inspired by Just Bento/Just Hungry's onigiri tutorial. Feel free to head over there for some great recipes, ideas and another angle on how to make this treat. Her's are decidedly NOT low carb! I took pictures of my process and explained how I did it because there are some differences, but the basics are the same.


You will need:
Hardware:
Bowl to hold your cauliflower
Grater or food processor
Plastic wrap
A cup or small container that holds aproximately 1 cup
spoon

Software:
1 bag of frozen cauliflower, or one head of cauliflower, cut up (will produce about 2.5 cups of cauli-rice)
2-3 tbs of cream cheese
Sea Salt
Bacon bits, or some other filling.

Before we begin: cook your cauliflower. I have discovered it is easier to process cooked. I normally take my cauliflower and microwave it for 5 minutes for fresh or 7 minutes for frozen. For this process I did it the night before.


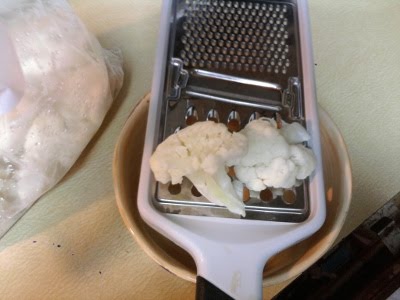
Grate your cauliflower on the largest holes of your grater, or process in a food processor until slightly larger than rice grains.


When you are done, it will look like this. If you are using leftover/cold cauliflower, I usually microwave it for 2-3 minutes to warm it up. If it's freshly cooked, you can skip this step and move to the next one.


Add 2-3 tablespoons of cream cheese and stir a bit, then microwave for another 30 seconds to soften the cream cheese. Once it comes out of the microwave, stir until combined. You might need to add a bit more cream cheese depending on how much cauli-rice you have.


Once your cauli-rice sticks together well, and can be squished into the spoon and stay, you are ready to make onigiri!


First, place a piece of plastic wrap in your container. Make sure it's large enough to go over the sides. You will need to be able to wrap your balls completely in the wrap.


Second, lightly fill the cup 3/4 of the way full, making sure not to pack it heavily.


Third, using your finger, chopstick or small spoon, make an indentation in the middle of the cauli-rice and fill with your filling. I used bacon bits, YUM!


Next, place another spoonful of cauli-rice on top, and pat down.


Finally, gather up the plastic over the ball, and twist.

After this step, if you want to shape it, I strongly recommend putting it in the fridge for at least 10 minutes to let the cream cheese resolidify. You can then shape it into the traditional triangle, or square, or even some other cute shape.

I keep these wrapped in plastic in the fridge for 3-4 days, but they rarely last that long.


Here is the finished product, with some fresh cracked pepper on top in today's bento.

If you want to see more low carb bento boxes, feel free to visit my other blog Low Carb Bento.

Faux Sushi Rice

Saturday, June 12, 2010

I've been playing around with riced cauliflower a lot this week. I am a huge fan of bento meals, and prior to eating LC, I loved onigiri, which is a savory rice ball, usually with a filling. It's a staple of "bento style" lunches, so I set out to make up a recipe for rice that would work that was:

1. Low carb
2. Not a lot of dairy/cheese
3. Yummy

This can be used for onigiri, and also sushi, as long as you use it while hot.

This recipe will make 2 rice balls or 3-4 sushi rolls.

1 cup frozen cauliflower
1/2 tsp sea salt
1 tbs cream cheese (I use one that is 1 carb per ounce)

Place the cauliflower and salt in a microwave safe bowl and cover. Microwave for 5 minutes.

Let it cool, take out of the bowl and either grate using a hand grater, or pulse in the food processor until the cauliflower is rice sized

Add the riced cauliflower back to the bowl and add cream cheese. Microwave for 30 seconds then stir until the cheese is completely integrated into the cauliflower.

You can use this to make sushi rolls or my favorite bacon filled rice balls. I'll have a tutorial about how to make them this week!

Flax Pancakes

Thursday, June 10, 2010

So, you want to get your flax in, but you're like me and not fond of the flax bowl muffins or bread recipes out there. To me, they can be a bit too dense and a bit too... flaxy. There are many recipes for flax pancakes, and I've used them all, but this is my own personal tweak on making a dairy free, low carb flax pancake that is as low carb as possible and dairy free. This is not induction friendly unless you cheat like I do and use almond milk in small amounts.

*note* The topping does have real cream cheese. I use this sparingly as the only dairy I use. My dairy restriction is due to a problem with a high level of blood calcium, so I can use small amounts on rare occasions. I've tried soy cream cheese, but it tastes like sweat socks and has a ton of carbs.

Alecto's Pan-Flax-Cakes with Cream Cheese Topping

2 tbs Sugar Free, Zero Carb Vanilla Syrup (Davinci is the usual brand)
2 tbs Flax Meal
2 eggs
1/4 cup Unsweetened Vanilla Almond Milk
1/4 tsp baking powder

1. Mix flax meal and baking powder in a small cup until completely combined.

2. Mix all of your wet ingredients in a measuring cup with a spout.

3. Combine the two and let sit for five minutes. This is very important to allow the flax meal to hydrate.

4. Heat a non-stick skillet or griddle on medium heat, and melt butter or heat oil to cook the pancakes in.

5. Pour small amounts of batter into your heated surface. It works best if they are no bigger than 4 inches across.

6. Cook until the middles are almost firm, flip and cook for another 2 minutes or until brown.

7. Nosh.

Makes 4 Pan-Flax-Cakes

Cream Cheese Topping
2 tbs cream cheese
1 tbs Sugar Free Vanilla Syrup

Put the cream cheese in a small container and microwave for 10 seconds. Mix in syrup and stir. Spread thinly on the pancakes.

Nutrition
Pan-Flax-Cakes
Calories - 341
Total Fat - 29.2g
Total Carbohydrates -8.6g
Dietary Fiber - 5.3g
Sugars - 2.8g
Protein - 16.9g

Topping
Calories - 70
Total Fat - 7.0g
Total Carbohydrates - 0.5g
Fiber - 0

Recipe Total Net Carbs - 3.8

Quick Breakfast

It's been drilled into our heads that breakfast is the most important meal of the day. I used to not be a big breakfast eater. I was lucky to maybe grab a bagel or some sort of microwaved, processed piece of junk. Most of the time I'd just skip breakfast all together. But since I started having hypoglycemic episodes, I have found breakfast helps keep my blood sugar stable.

The problem with breakfast is most people complain they have a lack of time. Well, with a few key investments, and an investment in yourself, I have found I can make and eat breakfast in the morning in less than 15 minutes with a bit of planning ahead. You are worth a 15 minute investment in yourself! Eggs, by far, are the cheapest and easiest way to get a good boost in the morning.

1. Buy a small non-stick skillet just for eggs and never let metal touch it. A non-stick skillet is simply the best thing for making egg dishes of all kinds. Scrambled, fried, or omelette, it will make cooking and clean up a breeze. I still use butter or oil with my non-stick.

2. Cook some things ahead of time. I tend to buy bacon in bulk and I love to make my own lower carb turkey sausage. I will cook large batches in the oven or on the grill, and then freeze in individual portions. You can just pop it in the microwave while cooking your eggs or getting dressed and you are good to go. If you enjoy hard boiled eggs, these are also excellent to make ahead on those "I hit my snooze button six times" mornings.

3. Include fat! It's tempting to grab the non-stick spray, but that pat of butter you cook your eggs in will not only make them taste divine, but will also add some fat and some staying power to the calories you eat. My completely non-scientific research on using butter versus spray on the same meal seems to indicate butter made me feel fuller longer.

Here is one of my go to breakfast options. It takes me less than 10 minutes from start to finish.


Bacon and Cream Cheese Omelette
3 eggs
2 tbs of water
1 tbs cream cheese, cut into tiny bits
1 tbs butter
2 tbs real bacon bits
1-2 shakes of Cavender's Greek Seasoning

1. Heat up a non-stick pan over medium heat, once the pan is hot add your butter and melt.

2. While the butter is melting, combine eggs and water, stir until combined completely. Add seasoning, stir even more until it's all well mixed.

3. Pour the egg mixture into the pan, cook until the bottom is set. Using a rubber or silicone spatula, lift the edges of the egg up and allow the uncooked egg to flow under the cooked egg

4. When it is almost set, add the cut up cream cheese and bacon bits to just to one side of the middle. Fold the eggs over the bacon and cream cheese and let cook for about 30 seconds.

5. Slide onto a plate. Eat. Savor. Mmmm..

Nutrition, Per Lose It!
Fat 35.5g 74%
Carbs 2.1g 2%
Protein 26.1g 24%

Cauliflower Rice

Saturday, June 5, 2010

Let me tell you about the greatest discovery I've made since I started Atkins - Cauliflower Rice. If you aren't a low carb enthusiast, or if you're new to low carb living, you might be looking at your screen like I've lost my mind. "But Allie, you can't make low carb rice! It's 20 carbs per half cup! I have to give it up to do low carb!" Well my dear friends, let me show you an excellent low carb rice substitute that takes very little work for some very tasty rewards, and is green to boot!

I've seen this recipe all over the web, and there are many variations, but this is mine. I am a huge fan of cauliflower florets on my salads and stir fries, but not a fan of the stems. This is an excellent use of the stems, though I usually include a few florets for a nice texture variance.

I have a few ideas of what to do with this discovery. I am a sucker for rice in general. It's one of my trigger foods. I am hoping to develop this a bit more so hopefully I can make some sushi and rice balls for my bento lunches. I need to figure out how to make them more sticky.

Cauliflower Rice a la Allie
Food
1 head of cauliflower
1/2 tbs of good sea salt

Equipment
1 fairly large bowl with a good lid or plastic wrap to cover it
Box grater
knife to trim the cauliflower
microwave

1. Trim and wash your cauliflower, cutting the florets off the stem. Dry it all very well
2. Grate the stem on the largest grater side. Put your bowl in the sink and do this in the sink because it's messy.
3. Grate a few of the florets as well, and once you get to where they are too small, you can always crumble them with your fingers.
4. Add salt, toss
5. Cover the bowl with either your lid or plastic wrap.
6. Microwave for 5-7 minutes.
7. Fluff like you fluff rice
8. Eat. Optionally with butter. Mmmmmmm.....

Low Carb Foodie Copyright © 2009 Designed by Ipietoon Blogger Template for Bie Blogger Template Vector by DaPino